Celebrate the New Year with a Bang! (How to Cut Your Own Bangs)


How to Cut Your Own Bangs
source
Want to try a new look for the New Year?  Why not get yourself some awesome blunt bangs? I've been sporting mine for about a year now and I'm loving it!  I cut my own hair and trim it every four to six weeks so that the hair does not get in the way of my vision  plus full side-swept bangs is a no-no for me.  There's just too much going on.  Let me show you the way I cut/trim my bangs ;)

First, get a good pair of scissors and a comb.  Position yourself in front of a mirror and get your hair ready by sectioning it.  Remember never to cut wet hair.  It will definitely shrink once it dries and make your bangs an awful lot shorter than you intended too.  Always cut with dry hair.  In my case because I have got naturally curly hair, I flat iron it first.
How to Cut Your Own Bangs
Determine the amount hair you want and section your hair by creating an inverted V from the crown of your head down to the forehead.  Remember, the deeper the V, fuller the bangs will be.  Let me show you a diagram from the "Queen of Bangs" herself, Zooey Deschanel ;)
How to Cut Your Own Bangs
source
The two points of the inverted V/triangle should line up with your eyebrows and the center part should line up with your nose.
How to Cut Your Own Bangs
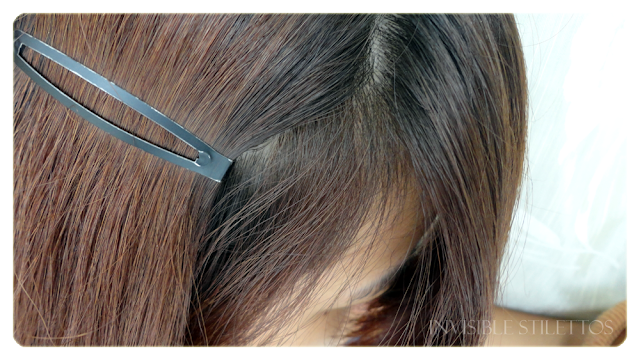
Use clips to pin back any hair that is not included in your bangs.  Double-check your sectioned hair to make sure it is even.
How to Cut Your Own Bangs
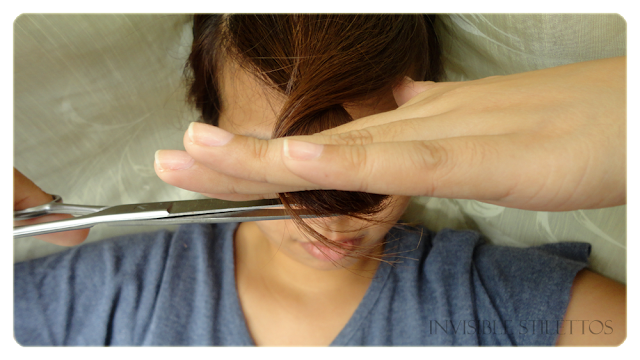
Now, get your scissors and let start cutting.  Get your sectioned hair and pull it down ever so gently over your face.  Give it a twist.  This method will give you that taper at the side of the bangs that would make the bangs blend to the rest of your hair.  Always, always cut below your fingers.
How to Cut Your Own Bangs
Start cutting in small increments, cutting straight across.  Do not rush it.  It is better to start with longer bangs then work your way up.  Release the twist.  Constantly comb your hair and check the mirror if you've cut the desired length.  Make sure that your eyebrows are relaxed and not in a surprised look so you do not over cut.  Soften the edges by cutting your hair with the scissors pointing up to give it a more natural, effortless, not-so perfect finish.
How to Cut Your Own Bangs
Run your fingers through your hair and let the rest of the hair down.  Cut longer pieces if there are any and you are done!  Remember, wearing your new bangs can take some extra confidence as it may seem odd and new to you for the first few days.  There will also be days when your bangs will have a mind of its own and start going directions you would not want them to.  For that, here's a tip I got from a YouTuber, you can always use a headband to help "train" your bangs and flatten it ;)
How to Cut Your Own Bangs
Now, rock those bangs girl!
Here's to a new and fresher version of you in 2014.
Happy New Year everyone!
Cheers!

Related Posts Plugin for WordPress, Blogger...

Super Yummy Baked Macaroni Recipe

A holiday favorite in our home, this Pinoy style tomato-based mac and cheese with loads of ground meat and mushroom is definitely a winner.  Think of it as a fusion of mac and cheese and lasagna.  Served with garlic bread, this dish is super duper delicious and of course, very easy to prepare.
Pinoy Baked Macaroni
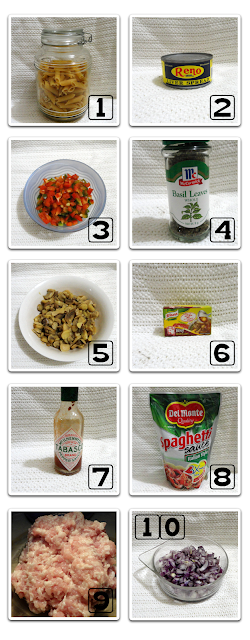
Here are the ingredients:
1.  Pasta, 500 g (Traditional elbow macaroni is recommended but you can also use penne rigate, rotini, or even farfelle.)
2.  A small can of liver spread
3.  Two medium-sized green and red bell peppers, diced
4.  Dried basil leaves (You can also use fresh basil leaves.)
5.  About a cup of sliced button mushrooms
6.  Beef buillion cubes
7.  Tabasco sauce
8.  500-mL Italian spaghetti sauce
9.  Ground pork or beef
10.  A cup of onions, chopped
Pinoy Baked Macaroni
For the bechamel sauce, you will need the following:
1.  One block of cheese, grated
2.  500-mL full-cream milk
3.  Nutmeg
4.  One-fourth block of butter
5.  One tablespoonful of all-purpose flour
6.  One-fourth cup of Parmesan cheese
You will also need salt, pepper, and 1 bay leaf :)
Pinoy Baked Macaroni
Let's get cooking!  First, cook your pasta to al dente according to package instructions.  You can also add two to three pieces of crushed garlic on boling water to add more flavor.  Stir occasionally to prevent sticking.  Drain and set aside.
Pinoy Baked Macaroni
In a separate pan, put ground pork or beef.  Cook until brown then add in a piece of bullion cube plus the chopped onions.  Cook until the onions become translucent.
Pinoy Baked Macaroni
Now, add the diced bell peppers, mushrooms, and liver spread.  Cook for a few minutes then season with dried or fresh basil and black pepper.
Pinoy Baked Macaroni
Next, add the prepared spaghetti sauce plus a splash of Tabasco sauce.  Simmer slowly for a few minutes until cooked.  Your red sauce is done!  Add in your pasta to your sauce, place in a microwave oven-safe glass baking dish, and set aside.Pinoy Baked Macaroni
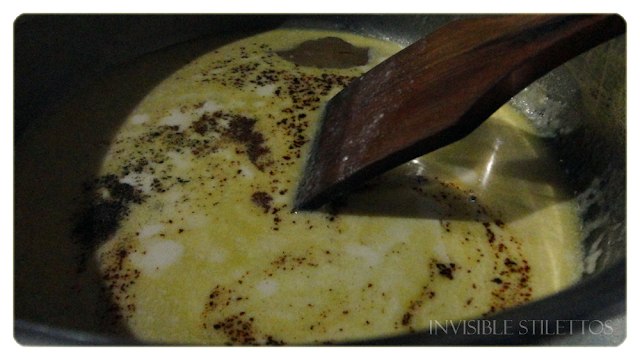
Now for the white/bechamel sauce, get a separate pan.  On low heat, melt the butter.  Once melted, add the flour.  Stir constantly until it turns golden sandy color.  Now that your roux is ready, slowly add in your cold milk stirring constantly to avoid lumps.  Add more milk as necessary then add your grated cheddar and Parmesan cheese and stir, stir, stir.  Stirring constantly under low heat is key to achieve silky and smooth mixture.  Season with black pepper, nutmeg,  and salt together with a dried bay leaf.  Simmer under very low heat.  Make sure to remove the bay leaf once the sauce is cooked.
Pinoy Baked Macaroni
Pour the white sauce over to your cooked pasta in red sauce and place in the microwave for 5 minutes on high or until the white sauce turns super gooey.
Pinoy Baked Macaroni
Serve with cheesy garlic bread (see recipe here) and enjoy!
Related Posts Plugin for WordPress, Blogger...

30 Lessons at 30

To celebrate my 30th birthday, I have compiled 30 of my favorite quotes/lessons learned in life.  
Here's my list:
(1)
30 Lessons at 30
(2)
30 Lessons at 30
 (3)
30 Lessons at 30
 (4)
30 Lessons at 30
 (5)
30 Lessons at 30
(6)
30 Lessons at 30
 (7)
30 Lessons at 30
 (8)
30 Lessons at 30
(9)
30 Lessons at 30
(10)
30 Lessons at 30
(11)
30 Lessons at 30
 (12)
30 Lessons at 30
 (13)
30 Lessons at 30
(14)
30 Lessons at 30
 (15)
30 Lessons at 30
 (16)
30 Lessons at 30
 (17)
30 Lessons at 30
 (18)
30 Lessons at 30
 (19)
30 Lessons at 30
 (20)
30 Lessons at 30
  (21)
30 Lessons at 30
  (22)
30 Lessons at 30
  (23)
30 Lessons at 30
 (24)
30 Lessons at 30
  (25)
30 Lessons at 30
  (26)
30 Lessons at 30
 (27)
30 Lessons at 30
  (28)
30 Lessons at 30
 (29)
30 Lessons at 30
(30)

30 Lessons at 30
I am so thankful for all the blessings and truly appreciate all the people who walked into my life, decided to stay, and made my life more special by sharing theirs with mine.
Looking forward to a better and meaningful year!
Related Posts Plugin for WordPress, Blogger...

Blue Christmas

It's the most wonderful time of the year!
Christmas is just around the corner and we've already set up our simple Christmas decorations.
Here's what we came up this year :)

For our front door, we have got this paper rose wreath (see tutorial here).  We just added a pine needle garland (99 pesos) around it and a cream colored ribbon with a small blue Christmas ball at the center to make it look more Christmas-y.
Blue Christmas 2013
For our living room center table, I bought a simple light blue place mat (29.75 pesos) and some blue Christmas balls (60 pesos for a pack of 12).  I already got this small fishbowl which I bought years ago for 120 pesos.
Blue Christmas 2013
 For the dining room, we've got this very old kitchen cabinet from my lola that I decorated with folded old books (tutorial here), some pine needle garland, glittered candle, and Christmas lights.Blue Christmas 2013Here is what I have got on the other side, some more folded books, and another glittered candle.
Blue Christmas 2013
At the center, I placed a shallow ball and filled it with blue and green Christmas balls (pesos 60 for a pack of 12), my coffee Christmas tree (What to make one?  Click here) and a jute string Christmas tree I also made.
I basically treated our kitchen cabinet like a fireplace mantle :)
Blue Christmas 2013
At our dining table, I placed a wooden tray and filled it with a jar of biscuits, a jar of cookies, a tin can of cocoa, some more pine needles, Christmas balls, a rose, and a bowl of apple-flavored candies :)
Blue Christmas 2013
We've also already wrapped some gifts and placed it under the Christmas tree
Most of them are handmade :)
Blue Christmas 2013
I wanted something cool and neutral for our tree this year, so we've got some cream-colored poinsettias which I bought for 19 pesos each.
Blue Christmas 2013
Another ornament I picked, Christmas bells with Christmas village silhouette.  I love this one and it was definitely a steal at 40 pesos each for a pack of 12.
Blue Christmas 2013
I also got some blue poinsettias (also 19 pesos each) and some silver ribbons (60 pesos a roll).
Blue Christmas 2013
We've got no star at the top of our tree.  I cannot find a silver star so I just placed a ribbon at the top, and remember those reindeers from my previous reindeer chihuahua tutorial?  Here they are making a comeback :) Spray painted them silver and placed them facing each other at the top of our tree.
Blue Christmas 2013
For the lighting, I made this jute string ball chandelier almost five years ago, still looking great and I love, love the shadow it casts on the wall.
Blue Christmas 2013
And of course, here's the most recent chandelier I made (tutorial here).
Blue Christmas 2013
Here's a full view of our Christmas tree.
We bought this six-feet tree (1000 pesos) three years ago and it's still in a pretty good shape.
Blue Christmas 2013
May peace and happiness be your gift this Christmas and your blessing all year through!
Happy Holidays from my family to yours!
Related Posts Plugin for WordPress, Blogger...